How to Convert PDF to Doc or Text using Google Docs
Most of the time when you share documents, we use PDF, which is the most commonly used format when sharing. Unless you have an editor, you cannot edit PDF files. If you want to edit documents, the best format is doc or text. There are many PDF to Word converters, but the one of the best free tools is to use Google Docs to convert PDF files to Word or text format. Optical Character Recognition (OCR) feature of Google Docs lets you convert images with text into text documents. Images can be processed individually (.jpg, .png, and .gif files) or in multi-page PDF documents (.pdf).
How to Convert PDF to Doc or Text using Google Docs
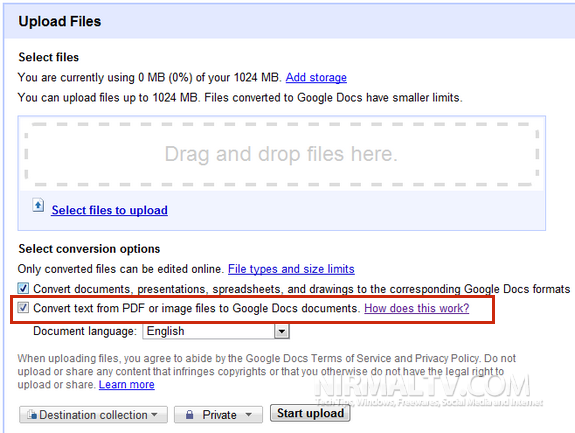
Firstly you need to upload the PDF file or Image file you want to convert, open the Google Docs file upload interface.

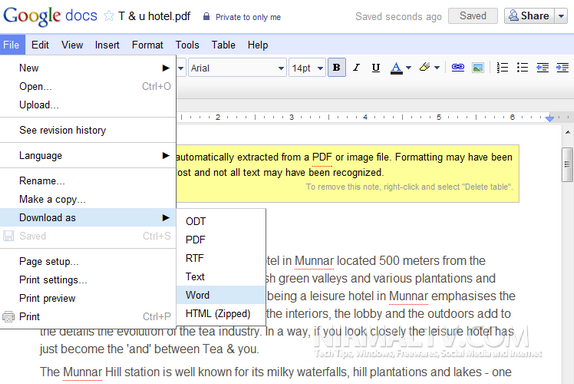
Select the file from your PC and check the box against “Convert text from PDF or Image files”. Click on the start upload button. Once the upload is completed, you can open the file in Google docs. You might see a note that not all formatting are retained while converting from PDF or Image to Doc.

You can add you own formatting and then select the file menu-> Download as-> Word. This will save the document in Word file on to your desktop.
File size limitations
The maximum size for images (.jpg, .gif, .png) and PDF files (.pdf) is 2 MB. For PDF files, it only looks at the first 10 pages when searching for text to extract.
Regards,
Lazy Goys Blog
How to Update Twitter and Facebook Status from Google+
Google+ is gaining popularity ever since its release and it has been well received by users. Now if you have shifted your networking to Google+ from Facebook and Twitter, you can still update the Twitter and Facebook status from Google+. This trick does not involve installation of any extension or add-ons, but uses the mobile functions of both these networking sites.
Update Facebook Status from Google+:
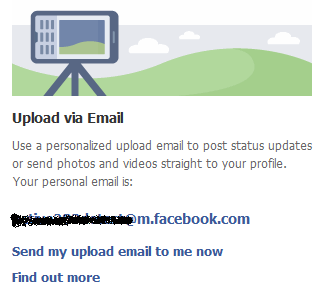
To update Facebook status from Google+, first grab your Facebook mobile email address from here. This address is unique for your account.

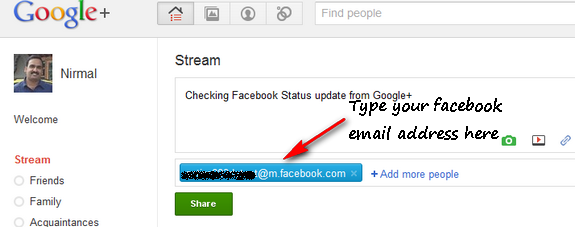
Now open your Google+ account and then type in your status update in the box. In the share with box, paste the Facebook mobile email address. Now share the post and you will see your Facebook status updated.

Thanks to Lifehacker for this tip.
How to Update Twitter from Google+:
Unlike Facebook, Twitter does not provide an option to update status via email, so we need to use third party tools like Twittermail. Sign in with your Twitter account and then get the email address associated with your account. Once you get the email address for your Twittermail, follow the same procedure as we did for Facebook. AviTricks has detailed post on how to publish to Twitter from Google+.
Additional Tip: You can create two circles, one for Facebook update and one for Twitter. Now add the respective email IDs to these circles. When you want to update status, add these circles to the list.
Regards,
Lazy Goys Blog
Who To Delete or Remove Recycle bin Icon from Desktop
If you are the kind of person who always likes neatness specially desktop, then here is a small trick for you that will simply remove the Recycle bin icon from desktop.
Follow the steps below:
[Start] [Run] [Regedit]
Registry Key: HKEY_LOCAL_MACHINE\SOFTWARE\Microsoft\Windows\
CurrentVersion\Explorer\BitBucket
Modify/Create the Value Data Type(s) and Value Name(s) as detailed below.
Data Type: DWORD // Value Name: NukeOnDelete
Setting for Value Data: [0 = Use Recycle Bin / 1 = Permanently Delete]
Exit Registry and Reboot
Another Method
start->run->gpedit.msc-> user configuration ->desktop->remove recycle bin from desktop->double click->change it not configured to enable->apply and ok.
now come to start->run->gpupdate.exe and press enter.
your recycle bin icon is gone from desktop nad you will need to revert your settings for get that back.
after reverting setting make sure to run gpupdate.exe command.
Regards,
Lazy Goys Blog
How to Block Facebook, Twitter, Email for Few Hours Daily
So you want to block Facebook, Twitter, Email for a few hours so you can stop wasting time and do some productive work. Well it is a simple task if you want to block users on your computers, or want to save distraction time for yourself.
I was trying to access Facebook at a friend’s computer, and as I browsed to the website, I got this alert and Facebook was blocked.
I tried Twitter.com and same for Twitter! Same for email… my entire social interaction was blocked.
My friend chuckled and informed that he had manually blocked social media sites like Twitter, Facebook and all his email accounts so that he could concentrate on his work productivity and not waste time. The blocked urls were released after a few hours (as per his settings) when he was relaxed and free to interact on these sites.
I really like the idea. How many times do we get started to work, and get hooked to chat or Facebook on the way.
How to Block Facebook, Twitter, Email
I hope you are using the Google Chrome browser (its the best out there), and install the Website Blocker extension. Edit some settings and you can block any website for as many hours as you want.
Choose the settings wisely and the extension provides a simple interface to block websites, as many as you want and at custom times you want. You can also type an optional message.
For example, this code will block access to Facebook.com urls from 0900 to 1700 (9am-5 pm). I have been trying this for a few days and I assure you it is worth your time to use this – and get on Facebook, Twitter and email when you really want to.
How to Block Any Website for Employees / Users
This extension works well if you want to prevent access of social media sites by your employees. Simply block the sites during working hours and they will never know how to access them.
1. Hide the Website Blocker icon from the Chrome toolbar. Right click the icon and click “Hide button”
2. Disable the link from showing in the block message alert which can guide people to disable the options. Also disable the ability to edit settings from the popup alert options
Unless people really know how to browse around into Chrome settings, identify the website blocker, experiment with its settings and disable it – it should work to block websites for most people. Just keep Chrome as default and only browser on the computer.
Regards,
Lazy Goys Blog
How to Create RSS Feed for Any Google+ Profile
Google+ profiles do not have RSS feeds. So how can you create and subscribe RSS feeds for any Google+ profile, which will let you add the feed to your Google reader and track all your Google+ profiles in one RSS reader?
Create Google+ RSS Feeds
Visit the Unofficial Google+ User Feed creator at plusfeed.appspot.com which lets you create the RSS feed for any Google+ Profile. Its very simple to use.
Lets say our Google+ profile url is
https://plus.google.com/110720484075426485909/posts
https://plus.google.com/110720484075426485909/posts
So we grab the unique long number for our profile
110720484075426485909
110720484075426485909
and add it to the url plusfeed.appspot.com and we get a url like this
http://plusfeed.appspot.com/110720484075426485909
http://plusfeed.appspot.com/110720484075426485909
This is a RSS feed url. Simply add this to your Google Reader and you can track all our Google+ updates.Similarly you can change that with your Google+ number or that of any user and subscribe to the RSS feeds in your favorite RSS reader like Google reader. The titles and content render very well. Since you have a RSS feed, you can also add it to your blog sidebar using RSS widgets
Tags: Rss Feed For Google plus, Google Plus Profile Rss Feed
Regards,
Lazy Goys Blog
convert 4.7 GB into 100MB
1) DivX Create Bundle
2) DVD2AVI
3) DVD Decrypter
4) LAME ACM Codec
5) Virtual Dub
Step (1): Insert your DVD into the drive and launch DVD decrypter. DVD Decrypter will detect the DVD and its file contents will now be displayed in the right pane. Now go to File > Browse and select the destination for the ripped VOB files. Keep in mind that the destination must have enough free space to store the contents of the entire DVD.
Step (2): After choosing the destination, click on File>Decrypt to start the decryption process. DVD Decrypter removes the Macrovision Protection by default, and you can set to remove region code as well by going to Tools > IFO > Region > Patch > Region Free. These are necessary for the next step. After the DVD ripping process is completed, close DVD Decrypter.
Step (3): Next Launch DVD2AVI. Go to File > Open. Make sure the correct track number in the Audio menu is selected. You need to find the correct track number-most DVDs have multiple audio tracks in different languages. This can be checked by selecting one track at a time and playing it. Also click on the Audio menu and navigate to “48>44.1KHz”, and select Off. Go to Help > SIMD Technology and select all the optimizations supported by your processor. Now go to File > Save As AVI.
Step (4): Decide on a file name and choose a location with enough free space. You will now be prompted to choose a video compressor. Choose “DivX 6.x.x” from the drop-down menu where you can select the video compressor.
Step (5): Under the Certification Profiles, you can choose an appropriate preset profile such as High Definition, Home Theatre, Portable, Handheld, and Unconstrained. When you choose one of the above profiles, it is virtually guaranteed that the encoded DivX file will be playable on any standalone DivX-certified player. Click on Settings. You can select a bitrate of your choice. A higher bitrate means a larger file size and better quality, while a lower bitrate means a smaller file size and lower image quality.
Step (6): In the Codec tab, you can set the Encoding mode. The default setting is a good trade-off between quality and compression, but if you wish to control the file size, you can state your own mode such as High Performance, Better Quality, etc. Click on OK and then on save to start the video
demultiplexing process. This will take some time depending on the speed of your computer. At the end of this process, you’ll have an AVI file and a WAV file.
Step (7): We now get to the creation of the DivX file-putting together the video (AVI) and audio (WAV) files that were created in the previous step. Launch Virtual Dub. Under File > Open, browse to the folder where the AVI and WAV files are stored. Select the AVI file and click Open.
Step (8): Click on the Audio menu and click “Full Processing Mode”. Click again on the Audio menu and select “WAV Audio”. You will be prompted to open a WAV file. Select the WAV file you created earlier and click Open. Click on the Audio menu and then on Compression. Select “MPEG Layer-3” from the left pane and then select “128 KBit/s, 48,000Hz, Streo” in the right pane. Click OK.
Step (9): Select Interleaving from the Audio menu. Then, select the “mis” radio button and input “500” into the “Interleave audio every” dialog box. Click OK. Again, in the Audio menu, select Volume. Check the box and move the slider to 200 percent. Click OK.
Step (10): From the Video menu, select Direct Stream Copy.
Step (11): Go to File > Save As. Enter a file name of your choice at a location of your choice, and click at a location of your choice, and click OK. This, again, will take some time, but not as much as the video encoding using DVD2AVI. After the process is complete, you’ll have a DivX backup of ypur DVD movie.
Step (12): All that’s left now is to burn the DivX backup up to CD or DVD using your DVD-Writer.
Regards,
Lazy Goys Blog
Who To Unlock All Levels In Angry Birds
Unlock All Levels in Angry Birds
Start the game and once its fully loaded, just paste this javascript code in the address bar and press Enter.
javascript: var i = 0; while (i<=69) { localStorage.setItem('level_star_'+i,'3'); i++; } window.location.reload();and all levels are unlocked….
In case, you want all levels to be locked again (and feel like you are cheating), then use this code:
javascript: var i = 0; while (i<=69) { localStorage.setItem('level_star_'+i,'-1'); i++; } window.location.reload();This is really a clever trick for those who just want to play the special Chrome only levels. Have fun.
Regards,
Lazy Goys Blog
How to Convert Flash SWF Files to HTML5
Convert Flash SWF Files to HTML5 files and use Flash content on devices without a Flash player like iPhones and iPads. Google Swiffy is a powerful online conversion tool which will convert Flash SWF files to HTML5 for free without the need for any expensive software.
Convert Flash to HTML5
Swiffy currently supports a subset of SWF 8 and ActionScript 2.0 with support for common SWF features like vector graphics, embedded fonts, images and timeline animation. They suggest your Flash animation as SWF5 file for better results.
Just upload your Flash .swf file and Swiffy will show you a preview and provide a link to download the html5 file (which will expire in 15 minutes). You can use the output in all Webkit browsers such as Google Chrome and Safari.
You might also be interested in a similar Adobe tool called Wallaby, which will convert Adobe Flash FLA files into HTML5. Wallaby needs to be installed and converts .fla files, whereas Swiffy is am online tool that converts .swf files.
Regards,
Lazy Goys Blog
How to Type Indian Rupee Symbol using Keyboard Keys
How can you type Rs. Indian rupee symbol from your existing keyboard keys? The new Indian rupee symbol is a hit, but many find usage difficult because there is no rupee keyboard key.
Right now you can download rupee font and use the symbol in your office documents easily. Webmasters can easily use rupee symbol online and add the rupee symbol to articles easily (like in this article). But what about having a direct keyboard key.
Type Rs. Indian Rupee Symbol
The Unicode Technical Committee has approved a code position for the Indian Rupee Symbol Rs., which means it will be available in modern keyboards soon and can be easily used across mobile phones and various web services. But till that happens, the amazing people at Foradian have a nice tutorial guiding you how to map the rupee symbol to a key in your keyboard.

- Download the Rupee Keyboard file (.zip) and extract the files
- Double click Rupee Installer.exe file and follow the instructions – now 4 new fonts will install to your computer with support for new rupee symbol in Unicode recommended code position
- Double click Keyboard Install.exe file - a new keyboard layout is installed in your computer. Right click on the task bar and select language bar from the toolbars menu > click on small keyboard icon and enable the Rupee Foradian Keyboard Layout
- Now you can use the grave accent key on the keyboard to type the rupee symbol by selecting the Rupee Foradian Standard fonts
Install Rupee Keyboard
Here is a step by step video about how they install the rupee keyboard.
If you set Rupee Foradian Standard as the default font in your browser, you can easily use the Rs. rupee symbol in any applications like gmail, twitter or facebook.
Regards,
Lazy Goys Blog
How to Embed Facebook Videos
It is easy to embed Youtube videos, but how to embed Facebook videos on your website/blog? Facebook videos have links to share the Facebook video on your wall/friends wall, but does not provide an embed code. Here is how to do it.
Go to Facebook Video Page
When you are viewing a Facebook video in your news feed / profile and reach the end, these are the options offered.
Click on the “Go to Video” link and you are directed to the Facebook video page.
Find Facebook Video Url
Now, look at the long url address in the browser location bar. It will look something like this:
This is the url of the Facebook video page and cannot be embedded. We have to edit/shorten this url to get the actual Facebook video url to embed. So this is the shorter url we need (note the changes, number stays same)
Get Facebook Video Embed Code
If you look at the old style embed code for any Youtube video, you find it looks like this:
This is a standard embed code for shockwave flash video. We have highlighted the embedded youtube urls. Now replace those youtube urls with the Facebook urls.
Paste in html mode in your post, and your Facebook video is embedded! You're done!
IMPORTANT NOTE: All Facebook videos are NOT in the public domain. Videos posted by Facebook users maybe copyrighted, personal, private, and may NOT be permitted for distribution or illegal to use without permission. So before you go ahead and embed any Facebook video, always seek permission from the video owner/creator!
Tags: allowfullscreen allowscriptaccess amp application bar code com copyrighted distribution domain edit embed embedded en facebook fs height hl http illegal important kdjuyfqijs0 link mode movie name note number object offered options page param permission post private shockwave shorter src true type url users value video wall width www x-shockwave-flash youtube
Regards,
Lazy Goys Blog
Go to Facebook Video Page
When you are viewing a Facebook video in your news feed / profile and reach the end, these are the options offered.
Click on the “Go to Video” link and you are directed to the Facebook video page.
Find Facebook Video Url
Now, look at the long url address in the browser location bar. It will look something like this:
http://www.facebook.com/video/video.php?v=123456789012345
This is the url of the Facebook video page and cannot be embedded. We have to edit/shorten this url to get the actual Facebook video url to embed. So this is the shorter url we need (note the changes, number stays same)
http://www.facebook.com/v/123456789012345
Get Facebook Video Embed Code
If you look at the old style embed code for any Youtube video, you find it looks like this:
<object width="500" height="314">
<param name="movie" value="http://www.youtube.com/v/kdjuyfQijs0?fs=1&hl=en_US"></param>
<param name="allowFullScreen" value="true"></param>
<param name="allowscriptaccess" value="always"></param>
<embed src="http://www.youtube.com/v/kdjuyfQijs0?fs=1&hl=en_US" type="application/x-shockwave-flash" width="500" height="314" allowscriptaccess="always" allowfullscreen="true"></embed>
</object>
This is a standard embed code for shockwave flash video. We have highlighted the embedded youtube urls. Now replace those youtube urls with the Facebook urls.
<object width="500" height="314">
<param name="movie" value="http://www.facebook.com/v/123456789012345"></param>
<param name="allowFullScreen" value="true"></param>
<param name="allowscriptaccess" value="always"></param>
<embed src="http://www.facebook.com/v/123456789012345" type="application/x-shockwave-flash" width="500" height="314" allowscriptaccess="always" allowfullscreen="true"></embed>
</object>
Paste in html mode in your post, and your Facebook video is embedded! You're done!
IMPORTANT NOTE: All Facebook videos are NOT in the public domain. Videos posted by Facebook users maybe copyrighted, personal, private, and may NOT be permitted for distribution or illegal to use without permission. So before you go ahead and embed any Facebook video, always seek permission from the video owner/creator!
Tags: allowfullscreen allowscriptaccess amp application bar code com copyrighted distribution domain edit embed embedded en facebook fs height hl http illegal important kdjuyfqijs0 link mode movie name note number object offered options page param permission post private shockwave shorter src true type url users value video wall width www x-shockwave-flash youtube
Regards,
Lazy Goys Blog
How To Boost Your Wireless Signal?
You want to get the most out of your wireless device and all the speed you can muster when you surf the web. The first thing you’ll want to do to make that happen is to make sure you’ve got a strong signal for your wireless device. Sometimes the elements aren’t all that cooperative. Obstructions, distance from the source, and antenna strength may conspire against you. Fortunately, there are some ways to overcome some of these.
Here are 10 ways to boost your wireless signal:
1. Re-positioning your router/antenna is almost always the best place to start when your signal is less than ideal. If you haven’t already, place it in as central a location as possible. There should be as few walls or other signal obstructions between it and the location(s) you will be working from most often.
2. Repeaters can be purchased, which can boost the signal strength of your existing antenna. Placing a repeater at a midpoint between your router and the furthest-most point of your coverage area is ideal.
3. You can also opt for an external antenna to replace the internal antenna of your router when so-equipped. Most router antennae are omnidirectional, which means they transmit in all directions. This isn’t always the best configuration, as it could also mean that much of your signal is being sent outside your area or into a nearby wall. Try a high-gain antenna that focuses the signal in one direction, where it’s needed.
4. Change channels. There are three channels that your router uses – 1, 6 and 11 – and it’s possible that the one you’re using isn’t providing the best possible signal. Consult your manufacturer’s configuration web page for how to change the channel.
5. While you’re there, check for any firmware updates that may increase your router’s performance, including signal strength.
6. Check also for firmware updates for your laptop’s network adapter.
7. Check to see if your router is getting interference from other devices that share its operating frequency. Most are set to use the 2.4 GHz range, which is shared by cordless phones, garage door openers, baby monitors and microwave ovens. You may need to put some distance between them, or consider switching to an 802.11n router, which also uses the 5.0GHz frequency.
8. Try replacing the wireless adapter in your laptop with a USB adapter with external antenna.
9. Check out DD-WRT.com for free open-source software that can increase your router’s performance.
Caution: use of this software can in some cases void your router’s warranty.
10. Using a single vendor for your router, antenna and adapter can mean better performance too.
Depending on your situation, gaining signal boost may be as simple as relocating or reconfiguring your router or antenna. Experiment a little before spending money. You could have everything you need already, just not in the best location.
Source: http://wirelessinternetreviews.com/industry-news/10-ways-to-boost-your-wireless-signal/
Tags: adapter already antenna area baby best better boost central change channels check com configuration depending device direction distance elements external firmware frequency ideal increase isn laptop location midpoint obstructions omnidirectional overcome performance possible providing relocating repeater replace router share signal software source strength updates uses wall ways web wired wireless
Regards,
Lazy Goys Blog


